At the beginning of a project or at any other time during the course of a project it might be important to include a list of required technical documents (e.g. technical drawings), often known as master drawing list.
PIRS offers therefore a quick and easy way to include all document information without having to manually create a PIRS document for each listed drawing. Hereby, you can either upload the documents in combination with the actual document / drawing file (e.g. the CAD and / or PDF file) or only integrate the necessary document information also known as meta information.
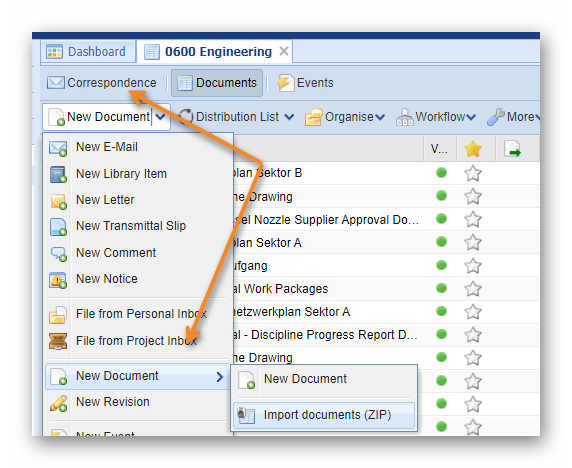
Every PIRS user that has the creator rights to the folder(s) he or she likes to import documents to will be able to choose the "Import Documents" feature presented to him / her in the "New" button options (compare to the screenshot).
By selecting this feature, an Excel file containing all the existing document information can be uploaded into the system.
You can find an excel sheet within the template chapter which can be used as template. All mandatory fields that need to be included are marked blue. Additional values can be added if necessary as new columns. Please make sure that new columns have the same title as the field you like to include in your upload.
In order to use a zip file to upload existing files together with our meta data you need to follow these steps:
-
first you need to create the list of documents containing values for all items in an excel list. Here you can use the provided template
-
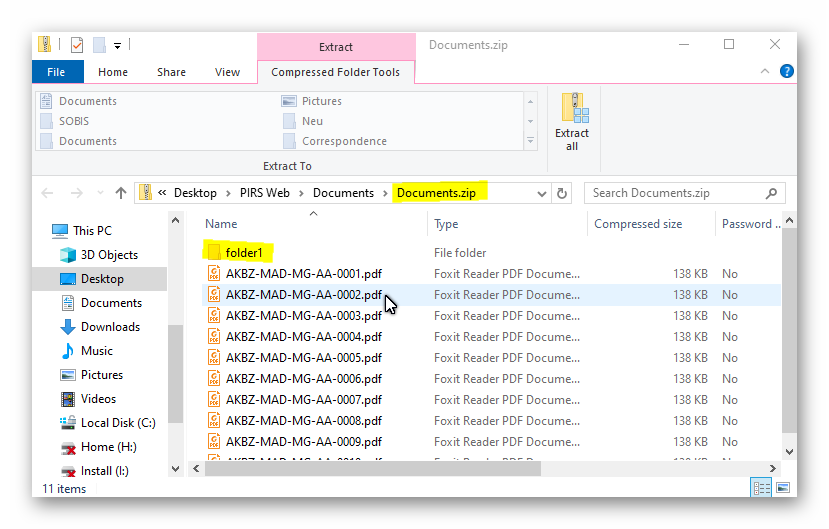
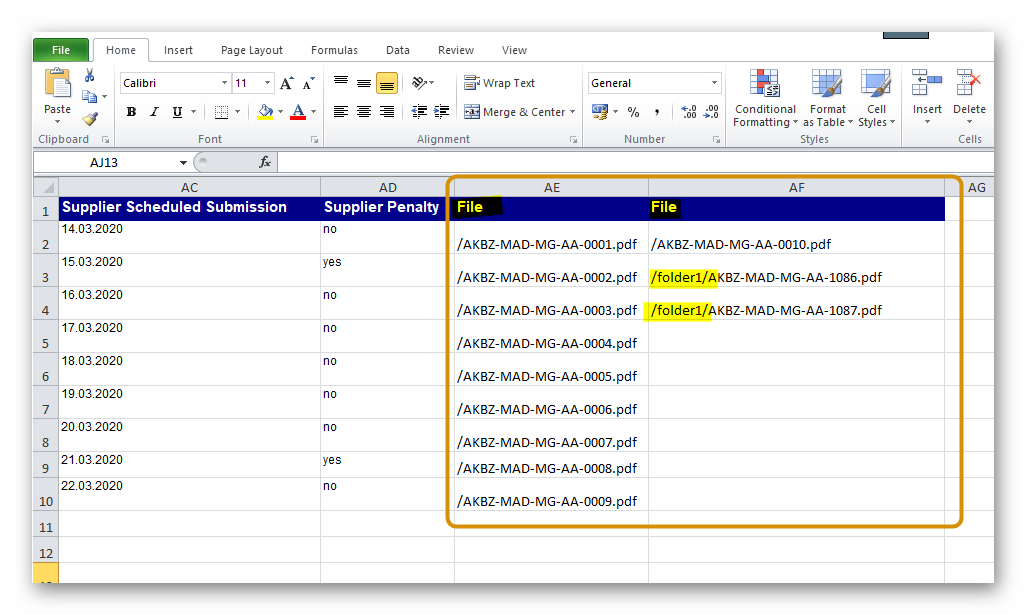
next you need to create a zip file of the files you would like to attach during your import and add the relative path of each file to the respective item in your list. Relative path means the path within your ZIP file to the file in question. So if your zip file contains simply a list of pdf files, you need to insert the path "/filename.pdf" if you zip file contains several folders the path could be "/folder1/filename.pdf" (compare with following screenshots)
Select "Import documents (ZIP)" as show in the screenshot below.
A new window will open allowing you to select the excel file with your document list. In the bottom area of the window you then need to add the ZIP file containing the files you like to upload and attach to your documents. You can add several ZIP files and each uploaded ZIP file will be stored in PIRS for 24 hours allowing you to import several document lists relating to the files in your ZIP file without having to upload the ZIP file every time.
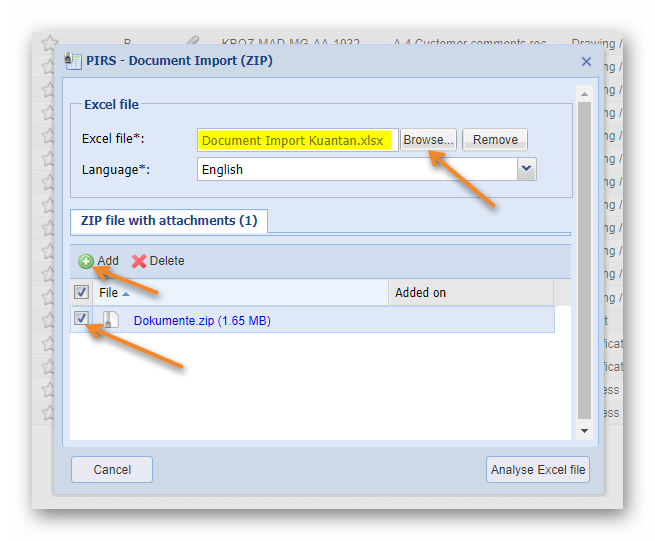
Use the "Browse…" button to select the excel file that contains the information for your technical documents and please be sure to select the ZIP file after you have uploaded it as illustrated in our example.
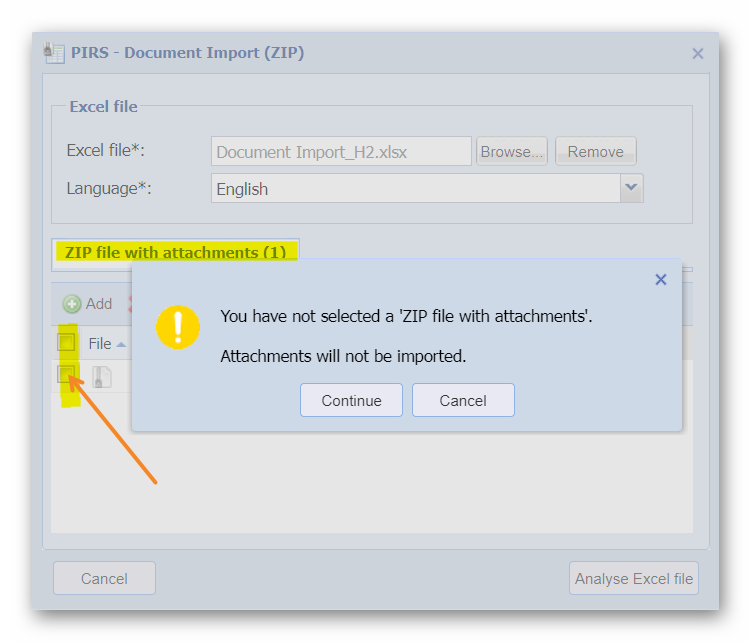
In case you have not selected a ZIP file PIRS will notify you that without a ZIP file selected, meta documents will be uploaded without any attachements. You can still proceed in case this was intential.
Start the analyzing process by clicking "Analyse Excel file". Since each document has certain mandatory fields that require the entering of a value before the system allows the user to save the document, these fields also need to be included in the Excel sheet and they need to contain a value for each listed document. Therefor, the excel file must be analyzed before the upload is permitted.
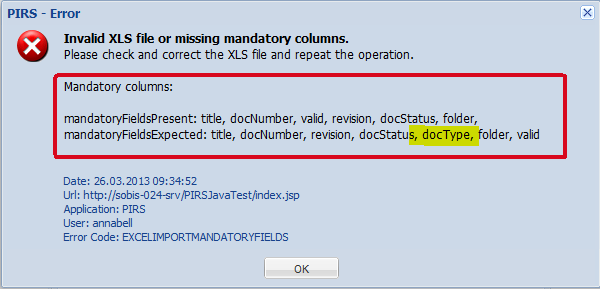
As indicated by the following screenshots, PIRS ensures that all mandatory fields are listed in the attached excel file as well as that the required information is included in the respective cells. PIRS will allow you to upload all other existing document information (e.g. the required transmittal dates). Should the imported excel file contain value fields that cannot be matched with fields in the PIRS document format, the system will also inform you about this fact even though the document import is possible and will be preformed.
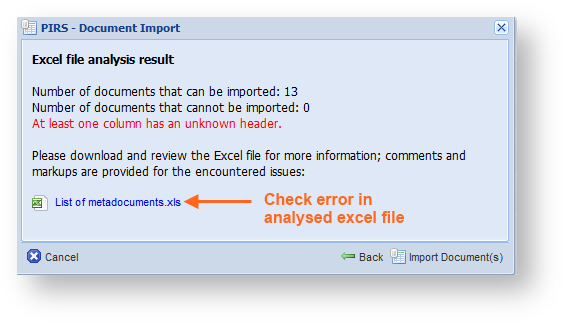
The third possible scenario would be that you have all mandatory fields listed and entered a value, but that the entered value for some or all documents cannot be matched to the information stored in PIRS e.g. you entered a name that is not listed in the address book or a document status that does not exist. In this case the import of these documents will not be possible. PIRS will inform you how many documents can and cannot be imported and will offer you an excel file of the analyzed list that you can open. Here you will find all documents that cannot be imported marked and commented.
Following table will give you a list of all mandatory fields, their label as well as remarks on important facts to keep in mind when entering value. The mandatory fields match the fields listed in the document header.
Mandatory Fields |
||
Field name |
Label |
Remarks |
Title |
Title |
- |
Doc number |
Doc number |
The entered number must be unique for each document and may not already exist within the project |
Valid |
Valid |
The value may only be "yes" or "no" |
Status |
Status |
The value has to match one of the options listed in the respective project. |
Revision |
Revision |
The value has to match one of the options listed in the respective project. Should your revisions be counted in numbers please ensure that the format of the cells is set to text and always escape the characters that you insert e.g. when entering the revision number 1.0 enter '1.0 and when the revision is 1 enter '1. |
Folder |
Folder |
The value has to match one of the options listed in the respected project. Also the whole path to the folder must be listed, the parent folder must be separated from the child folder with a back-slash e.g.: 0600 Engineering\0600.10 Overall Engineering |
Type |
Type |
The value has to match one of the options listed in the respective project |
As mentioned above the document import also gives you the opportunity to include the actual document files (e.g. CAD, PDF etc.) stored on your company’s FTP server. As indicated in the screenshot of the PIRS document import box above you are able not only to attach an excel file from your browser but also to enter your FTP server information (IP address) and your log in information. Should your excel file provide PIRS with the path information on the FTP server to the respective document files for each imported document, the files will then be attached to the newly created PIRS documents accordingly. You are of course able to attach multiple files to each document. An example will be given at the end of this chapter.
First, the following tables will list all other fields according to the tab in the content area where they can be found.
Not Mandatory Fields - Details |
||
Field name |
Label |
Remarks |
Issue Date |
Issue Date |
Make sure that this column in your excel sheet is marked for containing date values. That way PIRS will recognize the date regardless of the format in which you enter the date. |
Total Pages |
Total Pages |
Enter only full numbers (e.g. 9 or 13 but not 9.5 or nine) |
Format |
Format |
The value has to match one of the options listed in the respective project |
Language |
Language |
The value has to match one of the options listed in the respective project |
Application Code |
Application Code |
The value has to match one of the options listed in the respective project |
Notes |
Notes |
- |
System |
System |
The value has to match one of the options listed in the respective project |
Reference |
The value has to match one of the options listed in the respective project |
|
WSB |
WSB |
- |
Activity ID |
Activity ID |
- |
Producer |
Producer |
The name has to match one of the options listed in the address book of the respective project |
Responsible |
Responsible |
The name has to match one of the options listed in the address book of the respective project |
Owner |
Owner |
The name has to match one of the options listed in the address book of the respective project |
Not Mandatory Fields - Customer & Supplier |
||
Field name |
Label |
Remarks |
Customer |
Customer |
The name has to match one of the options listed in the address book of the respective project |
Doc number |
Customer Doc number |
The entered number must be unique for each document and may not already exist within the project |
Revision |
Customer Revision |
The value has to match one of the options listed in the respective project |
Status |
Customer Status |
The value has to match one of the options listed in the respective project |
Category |
Customer Category |
The value has to match one of the options listed in the respective project |
Scheduled Submission Date |
Customer Scheduled Submission Date |
Make sure that this column in your excel sheet is marked for containing date values. That way PIRS will recognize the date regardless of the format in which you enter the date. |
Penalty |
Customer Penalty |
The value may only be "yes" or "no" |
Notes |
Customer Notes |
- |
Supplier |
Supplier |
The name has to match one of the options listed in the address book of the respective project |
Doc number |
Supplier Doc number |
The entered number must be unique for each document and may not already exist within the project |
Revision |
Supplier Revision |
The value has to match one of the options listed in the respective project |
Status |
Supplier Status |
The value has to match one of the options listed in the respective project |
Category |
Supplier Category |
The value has to match one of the options listed in the respective project |
Scheduled Submission Date |
Supplier Scheduled Submission Date |
Make sure that this column in your excel sheet is marked for containing date values. That way PIRS will recognize the date regardless of the format in which you enter the date. |
Penalty |
Supplier Penalty |
The value may only be "yes" or "no" |
Notes |
Supplier Notes |
- |
Not Mandatory Fields - Workflow |
||
Approval Configuration |
Approval Configuration |
In case your PIRS project supports the PIRS workflow module you are able to select the workflow fitting for the document by entering the workflow title under which it is stored in PIRS. |
|
Please ensure that the cell format of the revision columns is set to text and be aware that when entering number values in the revision columns you must escape the characters (e.g. '1 instead of 1). Without escaping the character Excel cannot distinguish between 1 and 1.0 as Excel interprets all these characters as numeric values and returns 1.0 for both cases. |