General
PIRS is a project based system which offers to set up separate, individually configurable spaces for each of your projects.
To set up a new project, you need to define the basic configurations used for your new project. These configurations (e.g. list of contacts, companies, keywords, correspondence codes etc) can of course be adjusted after project set up and are not set in stone.
When a new PIRS project should be created, e.g. the first one you will work with, your SOBIS responsible will send you the PIRS project import sheet and will ask you to enter all project specific values. You can also find a current copy of the import sheet with examples within the Templates chapter.
Following, we will go through this sheet step by step and explain which information is required, how you need to enter values and also at where the values refer to in PIRS.
How to fill out the Project Import Sheet
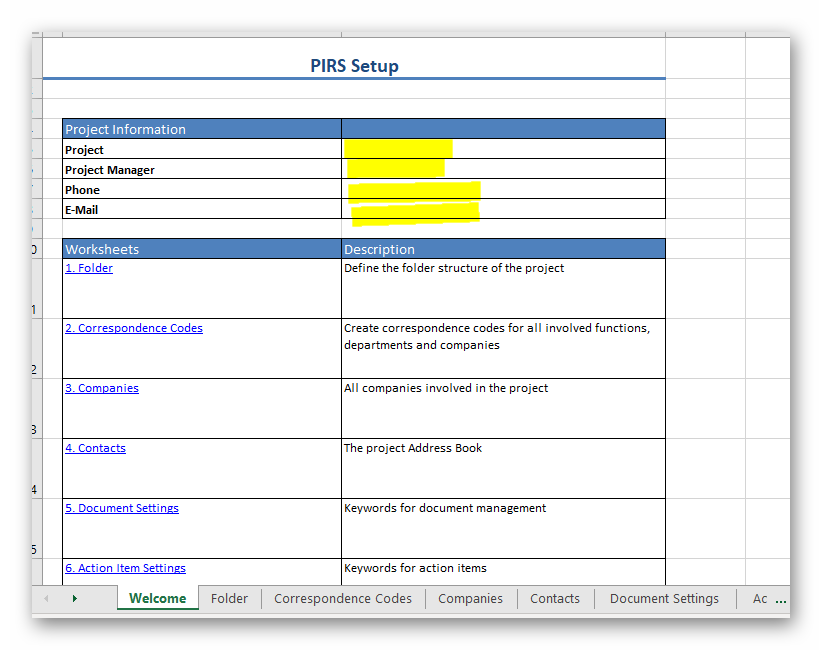
The first tab within the Excel file has no intimidate influence on a successful project set up. It would however be helpful to provide our team with the project specific information, marked within the screenshot below.
Folder Tab
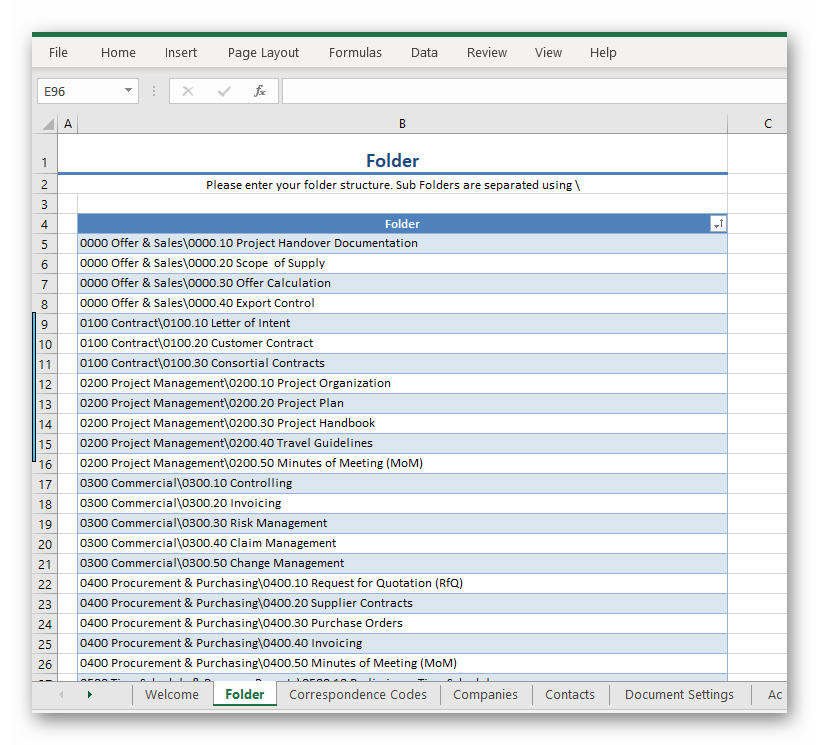
Within the folder tab you need to define the set up of your folder structure.
There are three things that you need to consider when entering values within the folder table:
-
Please always enter the entire folder path for each folder
-
Use the backslash (\) to separate the parent folder from the sub folders (e.g. 0600 Engineering\0600.10 Overall Engineering\0600.10.01 General)
-
You don’t need to list a separate entry for the parent folders. They will be created automatically. So when entering the sub folder value "0600 Engineering\0600.10 Overall Engineering\0600.10.01 General" a total of three folders will be created:
-
0600 Engineering
-
0600.10 Overall Engineering
-
0600.10.01 General
-
Correspondence Codes Tab
Correspondence Codes are used to create the unique reference number when saving and/or sending information from PIRS (e.g e-mails, transmittal slips, letter, etc.). They are usually assigned to contacts listed within your project address book and the reference number is then created automatically when saving or sending a correspondence.
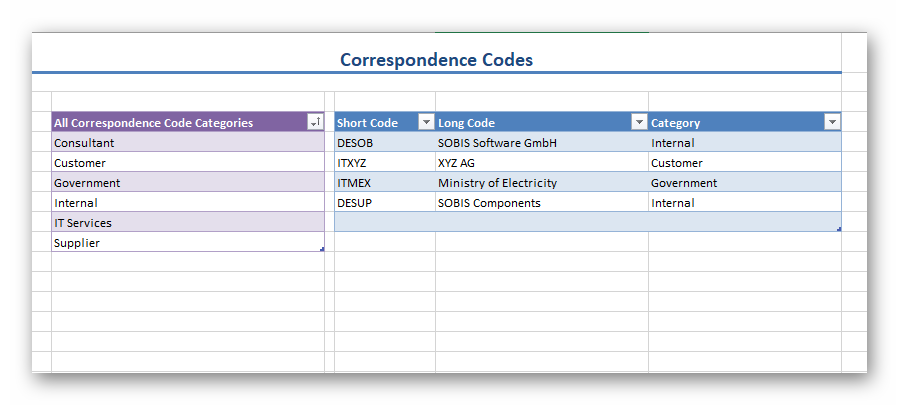
Within the violet column you can enter different categories for your correspondence codes. The Correspondence Code Categories can help you within the project administration to filter sort and better manage your correspondence codes. They are not displayed within a PIRS contact form.
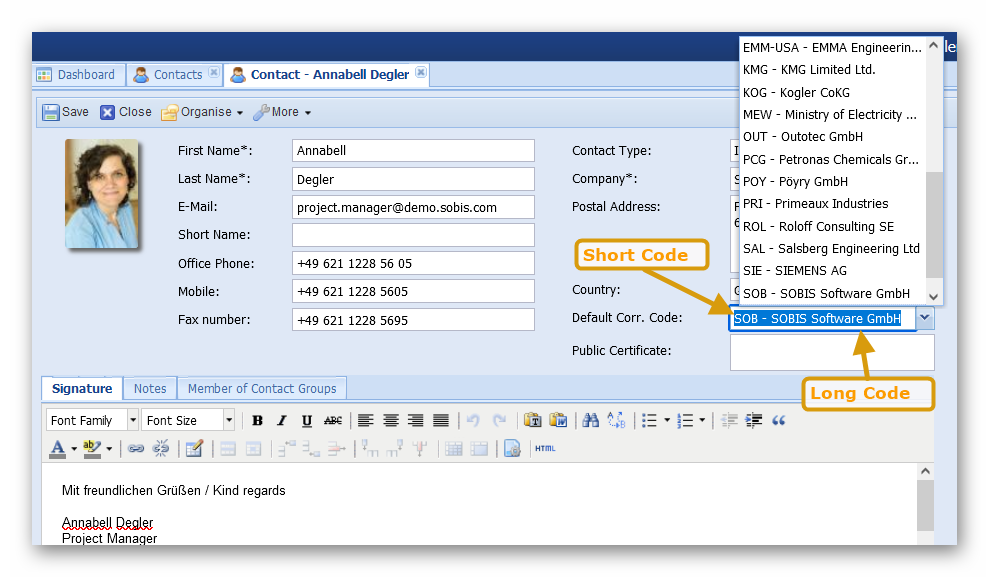
Within the blue columns you need to enter the actual code values. The short code is the letter and/or number combination used for creating the reference number. You could e.g. use two digits for the country and then an abbreviation of the company name. The long code will help you and other users to better identify what the short code stands for. Within the contact form the long code will be displayed after the short code in brakes or separated by a minus symbol.
When entering values for the Code Category, please make sure that you only pick values that you have also listed within the violet column (All Correspondence Code Categories)!
Companies Tab
Within this tab you need to list all companies involved within the project. Alternatively, you can of course also list all companies maintained within your central address book. Generally, we would recommend to go for a shorter list, since it is more user friendly.
To import a company entry successful, you only need to enter values for the column "Name", "Code" and "Type". The column code refers to the correspondence code. Please make sure that you only enter values that you have already listed within the correspondence code tab.

Don’t forget to list your own company.
Contacts Tab
The only mandatory information that you need to provide for each contact listed within the contact table are:
-
First Name
-
Last Name
-
E-mail
-
Contact Type
-
Correspondence Code
Please be aware that the values for Contact Types need to be defined within the violet column "Contact Type Categories". If you enter a contact type value that is not listed within "Contact Type Categories" the project import will not be possible.

The values entered as default correspondence code must also always be listed within the correspondence code tab described above.
Document Settings Tab
There are a lot of options within the PIRS document to enter and maintain meta information. This aims to allow you, the users and the managers to better find information, stay on track and be able to better analyze project performance.
Within the tab document settings all available meta data fields are listed. You might not need all of them or only at a later point of the project. At this point, we also want to remind you that it is also possible to hide certain document meta data tabs (e.g. customer & supplier information tab) within your project.
However, it is necessary to enter values for all mandatory fields (all document header fields) and we recommend to take a look at the position of each field within your PIRS document (or transmittal slip) to evaluate whether or not you need to maintain information here and if so, what values you would like to provide. Take a look at the following screenshots to get a better understanding.
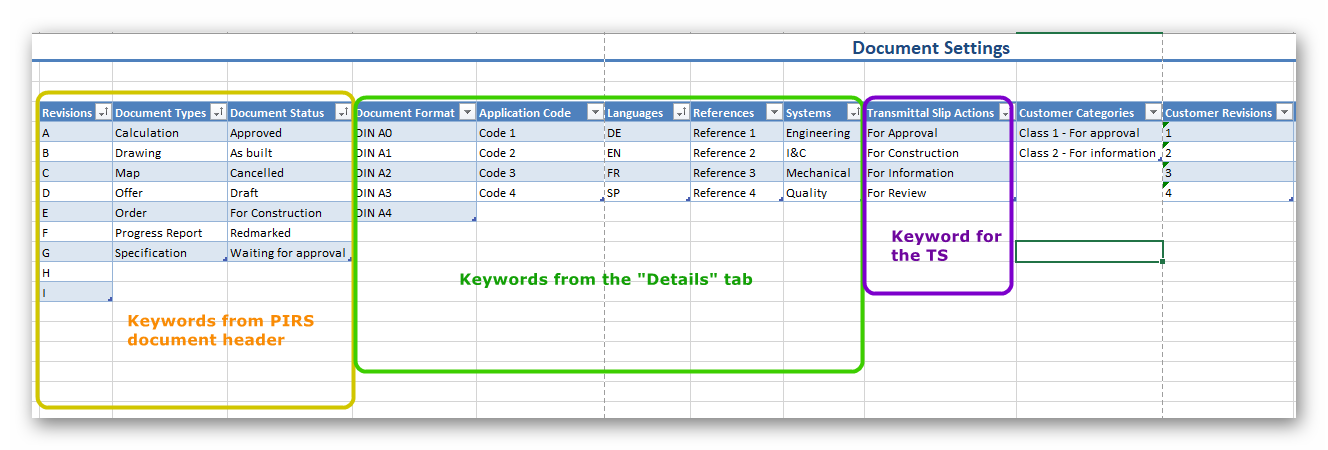
As mentioned above, values need to be provided for the mandatory fields listed within the document header (Revision, Document Types, Document Status).
The fields Document Format, Application Code, Languages, References and Systems are all listed within the "Details" tab within the PIRS document.
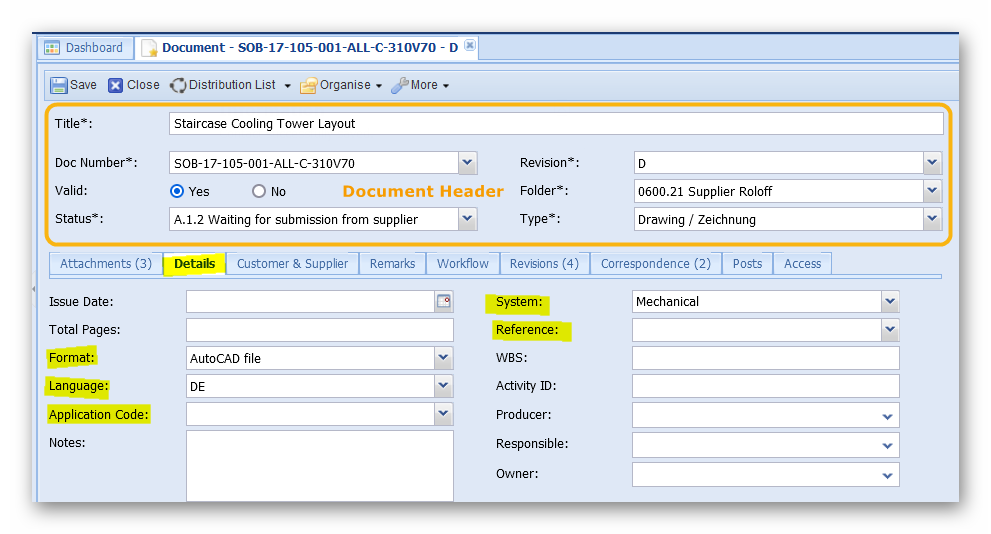
Application Code, System and Reference can be used to maintain internal meta information that you have been working with already. In case you would like to change label names to make it easier on you users to work with PIRS and better recognize your traditional work process, please contact your PIRS responsible.
The following screenshot shows you the keyword lists offered within the Customer & Supplier tab.

Besides different document numbers, you are able to maintain different values on customer or supplier related document categories, status, and revisions.
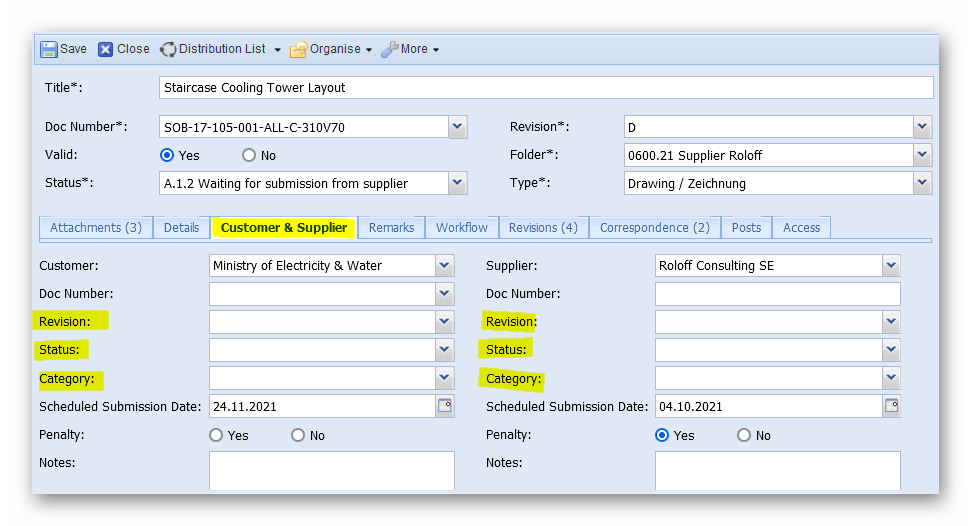
Generally, you can always enter a minus symbols within the list of values and develop or adjust the setting after project set up, if needed.
Action Item Settings Tab
Action Items allow PIRS users to set reminders, manage tasks for themselves as well as for their team members and follow up on open issues or create punch lists.
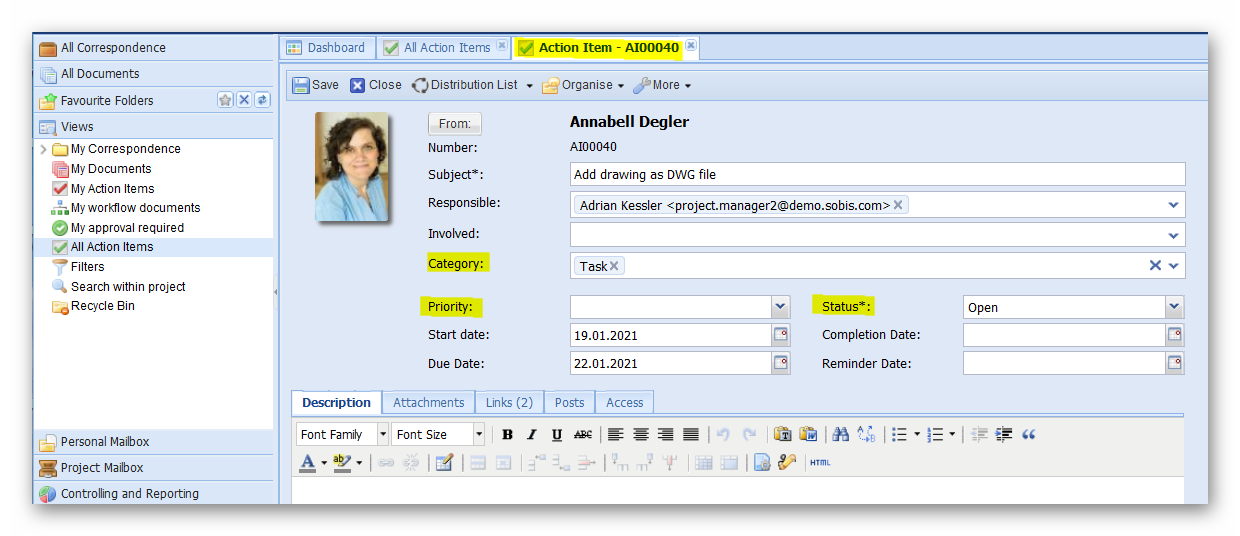
Within the import sheet you can set values to define the priority of an Action Item, assign a category and manage status settings.
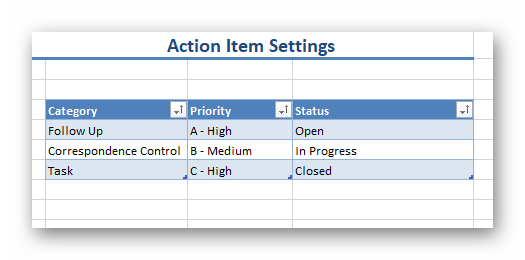
Following screenshot will illustrate where the values will be displayed within the Action Item.
Tag Labels Tab
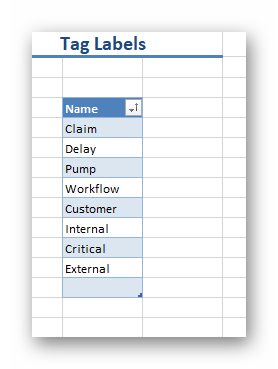
Tags can be set for all PIRS documents and correspondence entries. They offer an additional set of keywords that can help categories, manage and filter information.
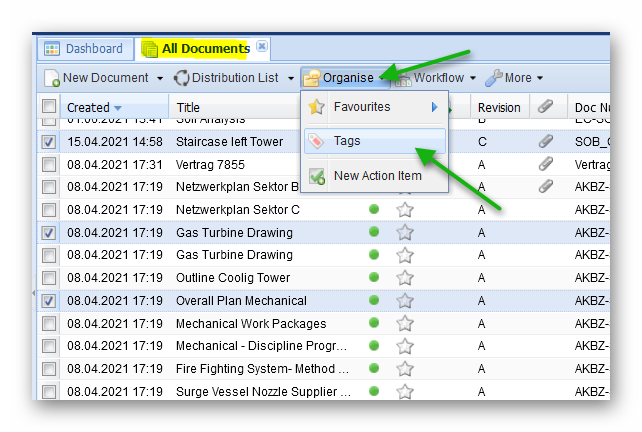
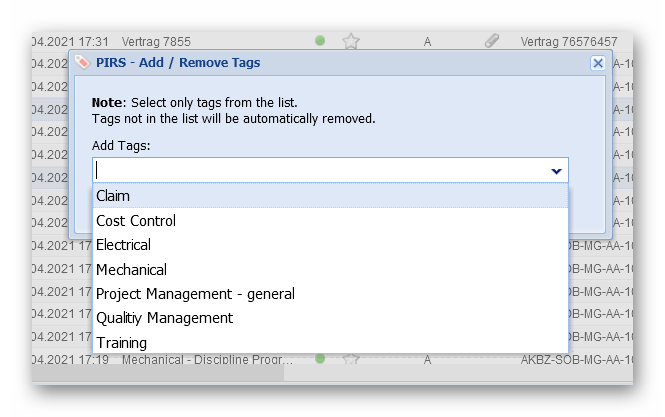
The assigning of tags is a rather simple process. The list can be edited any time within the project administration.
Please don’t hesitate to contact our service desk or you SOBIS responsible if you need any assistance.
Also, in case you have an existing PIRS project that you would like to use as a base to create a new project, let us know. We can use existing projects to transfer setting into a new project. In this case, you are not required to fill out the import sheet from scratch.