General
 As mentioned in the chapters above, PIRS enables you to customize the grid of your correspondence and documents display.
The following chapter will illustrate how to modify a grid using the example of the view "All Correspondence".
As mentioned in the chapters above, PIRS enables you to customize the grid of your correspondence and documents display.
The following chapter will illustrate how to modify a grid using the example of the view "All Correspondence".
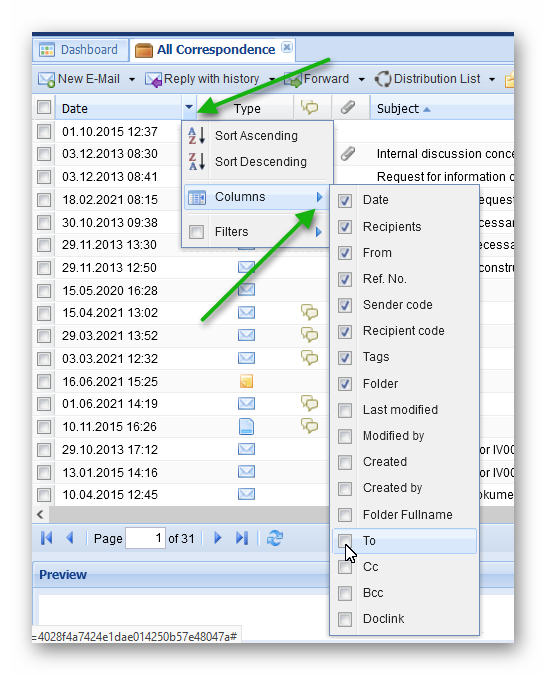
All available columns can be added or removed easily. First you need to move your cursor over any of the displayed columns. A small arrow head pointing downwards will appear in the corner of the column. As indicated by the screenshot, a window listing several options will unfold as soon as you click the arrow head. If you next select the option "Columns" a list of all available columns will be offered. Those columns currently displayed in the view are indicated by check marks. You can select additional columns and deselect those that are unnecessary to you.
In a next step you can restructure the order of the columns via drag and drop. Simply left-click the column you would like to reposition e.g. "Subject" and hold the left-click while you move the column from its initial position to the position you prefer. All your customizations will be stored and won’t be lost when you close the application but will be presented to you the way you customized it. The customizations can be undone however within your personal settings (compare User preferences).
Keep in mind that when you make changes within one correspondence grid (e.g. "All Correspondence") they will be memorized for all other correspondence grids and displayed for all your sessions. It is the same for the documents grids.
Filter selection
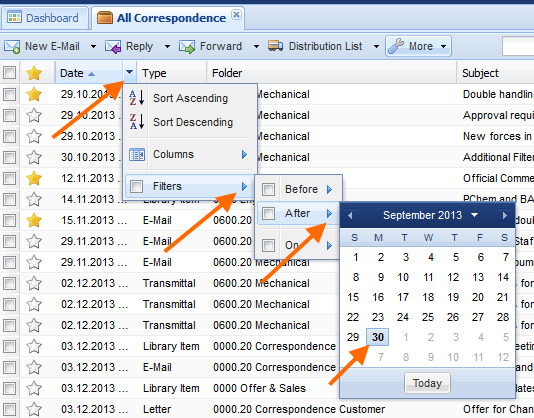 Additionally, PIRS allows you to customize each column separately to display only those files that match certain filters.
To activate a filter you first need to click the arrow head in the corner of the column you would like to adjust and next hover your cursor over the filter option in the displayed selection box.
As exemplary illustrated in the image, for each column there are column specific filter options from which to choose from.
In the example you have the choice to select either a filter that shows all files before, after or on a specific date.
Additionally, PIRS allows you to customize each column separately to display only those files that match certain filters.
To activate a filter you first need to click the arrow head in the corner of the column you would like to adjust and next hover your cursor over the filter option in the displayed selection box.
As exemplary illustrated in the image, for each column there are column specific filter options from which to choose from.
In the example you have the choice to select either a filter that shows all files before, after or on a specific date.
Each filter can be deactivated simply by removing the check mark in the column selection box. To remove all filters in one step, select the "Clear filters" option offered to you within the "More"-features in the view’s action bar. For more detailed information about filtering files please refer to the chapter Filter data.