General
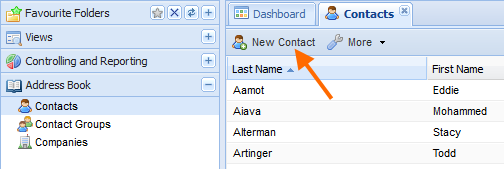
In order to create a new contact click the "new contact"-button located on the left hand side of the "Contact View" action bar, as indicated on the screenshot to below. The new contact document will then be opened in a new tab.
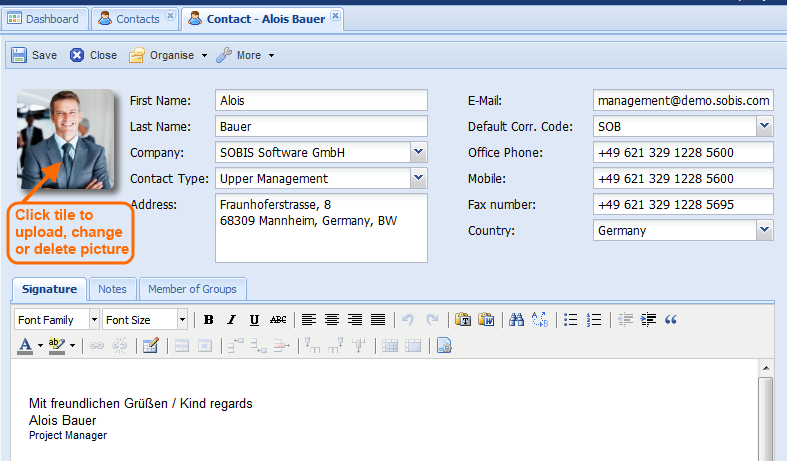
 The empty body field in the content tab structure positioned at the lower part of the contact document can be used to enter a company signature.
The signature will be used as template to be inserted automatically into the body of new email correspondence created by the respective project member.
The empty body field in the content tab structure positioned at the lower part of the contact document can be used to enter a company signature.
The signature will be used as template to be inserted automatically into the body of new email correspondence created by the respective project member.
The second tab "Notes" allows you to enter any additional information about the project member. The third tab will display a list of all contact groups the project member is currently a member of. Please be aware that this list cannot be altered within the contact document, it serves simply informational purposes. If contacts need to be added to certain contact groups this needs to be done within the "Contact Groups" view. (For further information please refer to the chapter Create a new Contact Group.)
The values that are supposed to be entered into the fields in the header (numbered in red form 1 to 11 in the screenshot below) will be described in the following table.
| Field name | Description |
|---|---|
First Name |
The first name of the person you wish to create this contact sheet for must be entered as field value. |
Last Name |
The last name of the person you wish to create this contact sheet for must be entered as field value. |
Short Name |
Short name can be an additional name or nick name. This field value is not mandatory. |
Company |
Here the company the project member works for has to be entered or selected. You can either type in the company name or type it in partially in which case the application will offer you a small selection of companies out of the project companies listed in the address book or you can open the complete list by clicking the arrow at the corner of the value field. Please be aware that the company field is a required value and that only companies that are already listed in the project address book can be entered or selected as true values. If you have already started working on the new contact document but haven’t added the affiliated company document yet, you don’t need to close the new contact document. PIRS enables you to also add the new company file while the new contact file is still open. Simply click the "Company View" within your address book navigation, add the new company document and then you can proceed to enter data into your contact document. The newly added company file will be available for selection immediately after the adding process is completed. (For information on how to add new companies please also refer to the chapter Add a new Company.) |
Contact Type |
This field value can only be selected form a list of contact types that were provided by your company. The selection process is similar to that of the company with the only difference that if you find yourself unable to select the correct value because the contact type you are looking for is not listed you won’t be able to add a new contact type on your own. In this case please either turn to your administrator or contact your PIRS support team. |
Postal Address |
The address field should be used to enter the address of the company location the project member is currently working at. |
Email address |
This field should contain the project member’s email address or if he/she has more than one the email address that the project member is using for the project communication. This email address will be inserted into correspondence and document files. This value cannot be empty. |
Default Corr. Code |
The default correspondence code that is chosen for a contact stands for the sender / the recipient code that will be automatically selected for the reference number of a correspondence or document as soon as the contact is entered as sender / recipient. The value of this field can remain empty and is not required for the contact to be valid. It is however highly recommended to set this value since it will save you time when creating new correspondence or document files. |
Office Phone Number |
None of these fields are required to be filled with information. It is up to you and your company directives to decide to enter the project member’s various telephone and / or fax numbers. You also will be able to save the contact document without having selected the country the project member is currently located at. To maintain all address book information as plenary as possible it is recommended to enter all contact information that is available. |
Cell Phone Number |
|
Fax Number |
|
Country |
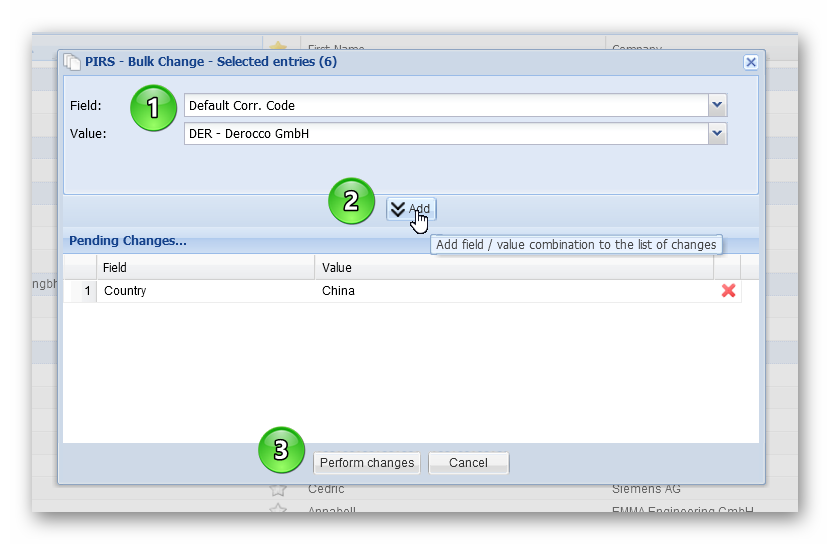
Bulk Change
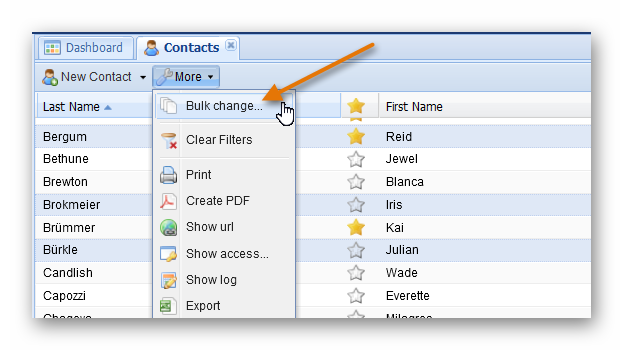
In order to change field values on several contacts in one go, PIRS offers a bulk change option within the "More" options of your tool bar. In case the bulk change is not displayed, please contact your Service Desk and request to activate this feature for your project.
The bulk change allows you to set new values to one or multiple fields of one or multiple contact entries. First select the contact(s) you would like to adjust. A new window will open where you are able to select first the field you would like to change and then select or enter the new value. Compare with the following screenshots.
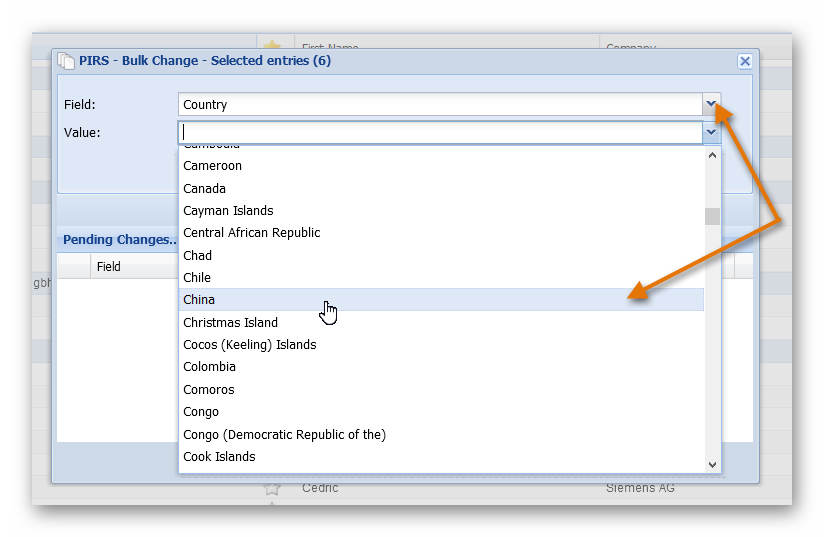
Click the "Add" button to confirm the value change for the selected field. In the screenshot the value for the field "Country" needs to be changed for all previously selected contacts.
You can chose to change the value of one or multiple fields in one go. Simply select another field, e.g. Default Cor. Code, set a new value, and again click the "Add" button. Once you have assigned new values to all the fields that require changing, click "Perform changes" and the settings will be adjusted accordingly.